Saturday, August 23, 2014

State Fair Competition - I'm In! 

Happy Saturday!  I'm so glad it's the weekend!  Exciting things going on in my neck of the woods - one of which this post is about. :) The State Fair is coming at the end of September, just one more month.  Woo-hoo!  The State Fair has been a big part of every year for me since I was just a wee little child. I don't care if it's the same stuff every year, I never lose my excitement for it. One of my favorite things now that I've gotten older though is the competitions. Last year was my first time entering in one of them and - you'll never guess ;) - it was the baked goods competition.  I didn't get a ribbon but I still was very glad to participate. However, this year, I'm bringing my A-game. After giving some thought to what I will enter this year I have decided on the following:
  1. Baking Powder (aka - Gun Powder) Biscuits
  2. Apple Pie
  3. Coffee Cake (for the King Arthur Flour challenge)
My biscuits have always been fabulous and have just become more so over the past year, so they're a given.  My apple pie can be pretty good if I do say so myself.  I started using a different recipe several months ago and it. is. incredible.  My main challenge there, will be ensuring that the crust is not too soggy on bottom.  I don't usually bake my pies in tin foil pans, so I will need to experiment with the crust in those pans to ensure it can be a success. And the coffee cake, well, who wouldn't love a good challenge like that?  I mean, not only do the winners receive ribbons, they also get King Arthur Flour gift cards. I'm all in! :) 

So here's to experimenting over the next couple of weeks and hopefully a ribbon!  Or, at the very least a spot in the display case.  And trust me, if either of those happen there will be photos

Thursday, August 21, 2014

Hot & Spicy Baked Salmon

Today I want to share with you a delicious, simple, lite, and HOT salmon recipe.  This is one of the easiest recipes in my kitchen and perfect for any weeknight. I personally prefer it with a little less black pepper, but my husband loves hot food and so this has become a staple recipe for us. :) 

Start off by placing the salmon fillets on a piece of foil that's in a glass dish.  


You'll cover them in a marinade of garlic, olive oil, basil, salt, black pepper, lemon juice,& parsley. Phew! That's a list!


Don't ya just love my little whisk? :)

 Marinate the fillets in the fridge for about an hour (or all day while you're at work!), turn them at least once, several times if you're able. (Actually, let me be honest. A lot of times I just smother both sides of the salmon and then don't even bother with flipping. ;) )


All that's left is popping them in the oven & baking for about 35-45 minutes or as is customary with fish... until they flake easily with a fork.

Okay, so not exactly the quickest recipe, but certainly easy.  I hope you enjoy. :)


Baked Salmon
2 garlic cloves, minced
6 tblsp. light olive oil
1 tsp. dried basil
1 tsp. salt
1 tsp. ground black pepper
1 tblsp. lemon juice
1 tblsp. fresh parsley, chopped
2 (6 oz.) salmon fillets -->(I usually do 4 and there's still plenty of marinade)

(1)In a glass bowl, mix garlic, light olive oil, basil, salt, pepper, lemon juice, & parsley.
(2)Place fillets in glass dish & cover with marinade.
(3)Marinate in fridge about 1 hour, turning occasionally.
(4)Preheat oven to 375.
(5)Place fillets in foil, cover with marinade, & seal.
(6)Place sealed salmon in glass dish & bake 35-45 minutes, until easily flaked with a fork.

*Recipe taken from Food.com*


Saturday, June 28, 2014

Simple Saturdays


This week's recipe is simple, easy, quick, and a well-known favorite.  Sausage balls!  Growing up, theses were a given at any party or big get together.  And there was never a single one left at the end.  I'm pretty sure just about everyone loves sausage balls so these work well for parties, breakfasts/brunches, appetizers, midnight snacks, anytime snacks... yes, definitely that last one! :)  

Up until recently, I thought that sausage balls could be made ONLY using Bisquick.  Excuse my naivete.  They can be made - quite well! - with flour and the basic ingredients that go along with it.  I don't usually make these because I don't keep Bisquick in the house since I make most things by scratch,but I wanted to make them for the hospitality table at my church in the morning and I discovered that you can indeed use flour!

Begin by mixing flour, salt, baking powder, cayenne pepper, and black pepper together.  (The peppers give it a slightly hotter kick that I actually liked!)


Melt 3 tblsp. of butter...


Shred cheese by hand or in a food processor.  (You can, of course, buy the shredded cheese at the store, but it tastes WAY better freshly shredded.  And your taste buds are sick if you don't notice the difference. ;) )


Add the meat to the rest of the ingredients and mix until it looks like this blob.


Roll into balls and cook.  You could probably use a cookie scoop for this part if you didn't want to use your hands.


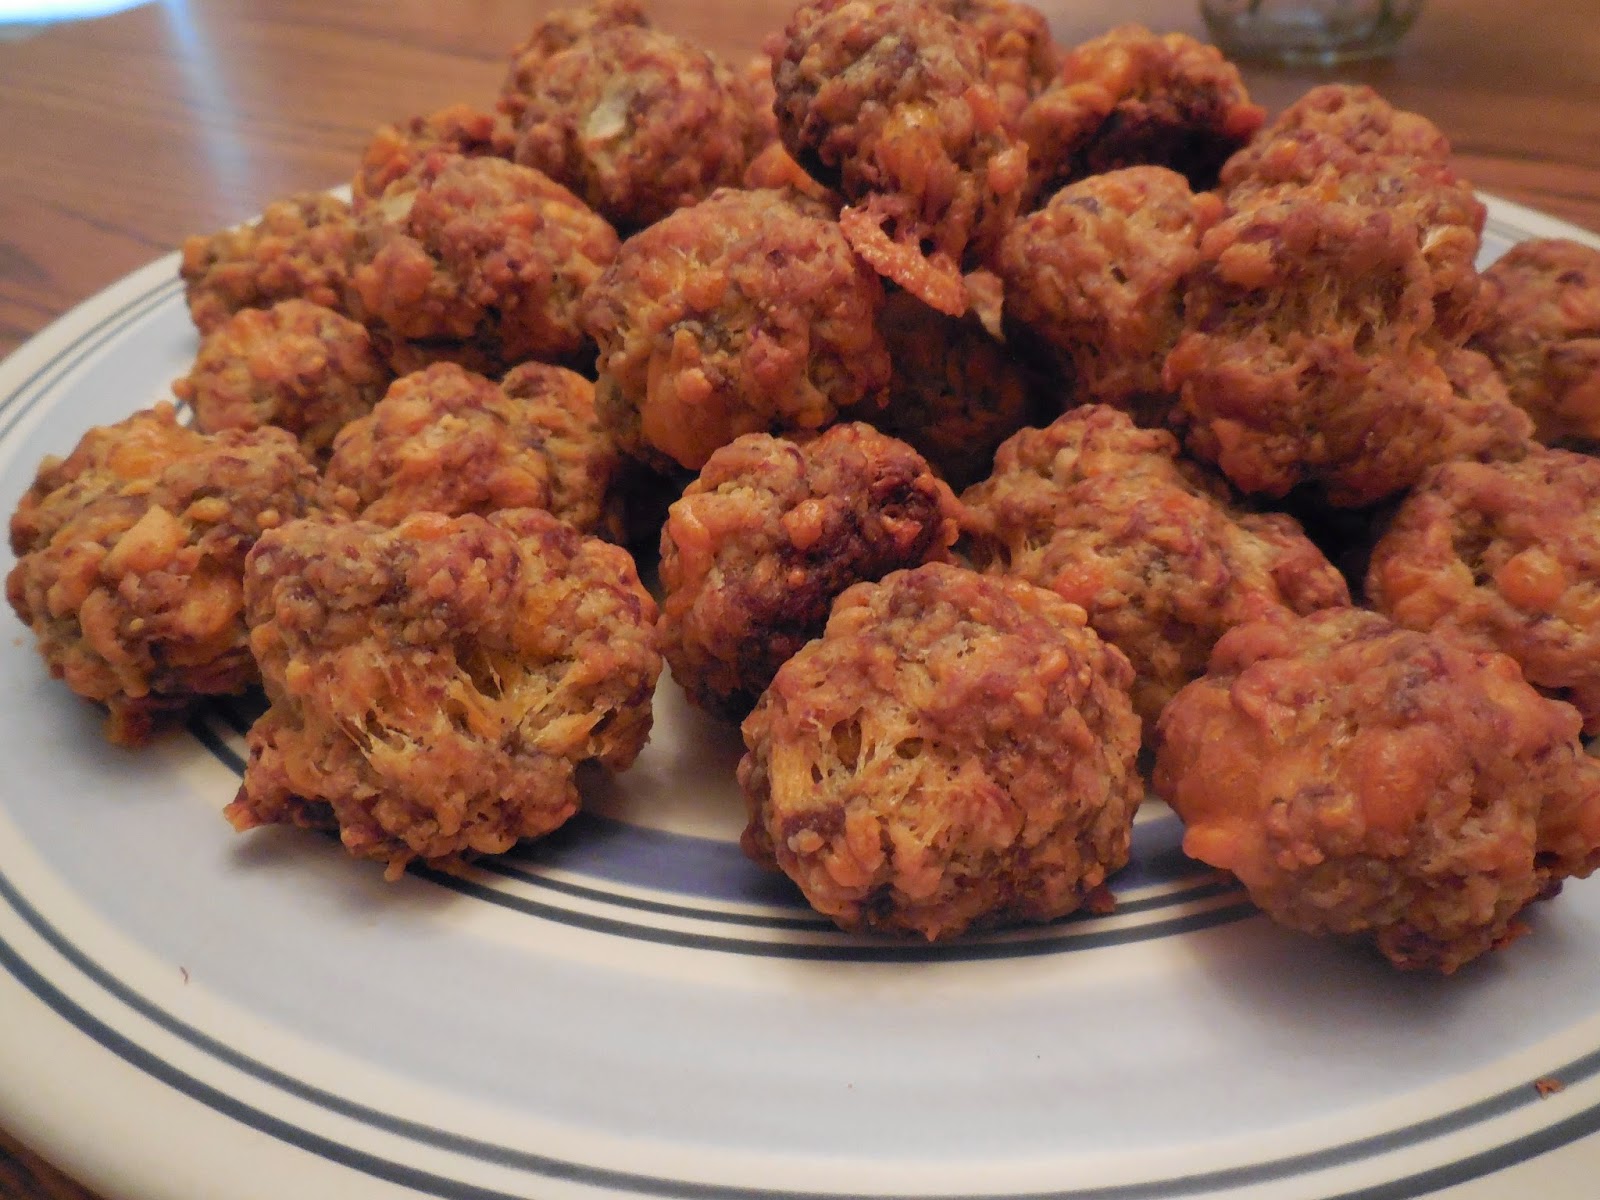
The finished product!  Now go enjoy. :)


That's it for today folks!  I'm off to enjoy the rest of my weekend.  I have a load of yummy dinner and dessert recipes coming your way soon, though. :)


Sausage Balls

1 1/4 c. all purpose-flour
1 1/2 tsp. baker powder
1/2 teaspoon kosher salt
1/4 tsp. cayenne pepper (or more, depending on how spicy you like it)
1/4 tsp. black pepper
8 oz. shredded cheddar cheese
16 oz. sausage
1/2 large yellow onion, grated (grating it gives the sausage balls some onion flavor without biting into big chunks of onion)
3 tblsp. unsalted butter, melted

(1)  Preheat oven to 400.  Grease baking sheet.

(2)  Whisk flour, baking powder, salt, cayenne pepper, and black pepper.  Add the cheese and toss to coat with flower mixture.  Add sausage, onion, and butter.

(3)  Shaped into balls and cook for 25 minutes.  

(4)  Eat hot or refrigerated - whichever your preference!


*I recommend having fun with this recipe and trying different things in it, I think it would be yummy to add crumbled bacon, green onions instead of yellow, or even blue cheese!  What would you add to make it different?*

Sunday, June 22, 2014

LAYER IT UP LASAGNA


I have finally attempted (quite successfully, I might say!)to make one of my favorite dishes of all time.  Lasagna.  This has been a dish that I have wanted to make since I was 4 years old.  That's as far back as I can remember! :)  I've always loved it and always thought it looked so fun to construct.  The first time I have ever took a bite of homemade lasagna I was in love.  Making my very own homemade lasagna has been a goal of mine for a long, long time.  When I received a lasagna pan as a wedding gift I got so excited I could hardly stand it!  

I was pretty terrified of cooking the noodles.  No joke.  I was worried I'd make a mess of it and break most of them.  Although it was rather interesting trying to get them out of the pan of boiling water in one piece, I did succeed!  This was a big step for me in my little culinary world. :)  As you can see, they turned out pretty good! 


While the noodles are cooking, you can go ahead and brown a mixture of ground beef and Italian sausage.  I like a meaty lasagna, so I put a pound of beef and a pound and a half of Italian sausage. 


Whip together Ricotta cheese and an egg in a bowl.  The egg added to the cheese makes the cheese more fluffy and bubbly once it's cooked.  In other words, gives it taste bud tingling visual appeal. :)


Now that everything is all prepped and ready to go - start layering up!

Sauce...


Noodles...


Ricotta/egg mixture...


Parmesan and Mozzarella cheese...


Meats and sauce...


And repeat until you fill the pan up. :)


And voila!  A few sprigs of parsley and it's all ready to go in the oven.  :)


Mmmmm....


Turned out pretty good for the first time! 
(My apologies for the awful photo quality.  My camera died right before so these were taken with my phone.)


Layer It Up Lasagna

1 1/2 lbs. sweet Italian sausage
1 lb. ground beef
2 big jars of spaghetti/marinara sauce
16 oz. Ricotta cheese
1 egg
5 cups freshly shredded mozzarella cheese
2 cups Parmesan cheese
1 box of lasagna noodles
Parsley
Garlic powder

(1) Boil the noodles.  While noodles are boiling, brown beef and sausage.  Drain a portion of the grease from the browned meat.  Leaving some grease adds great flavor to the sauce! 

(2) Whip Ricotta cheese and egg in a bowl and set aside.  Shred mozzarella and Parmesan cheese.  (Or used the bagged kind, but it tastes WAY better freshly shredded.)

(3) Preheat the oven to 350.  Begin layering ingredients in a lasagna pan.  I usually layer in this order - sauce, noodles, Ricotta cheese, mozzarella & Parmesan cheese, meats.  Repeat until the pan is full.  Top with remaining shredded cheeses and then sprinkle with garlic powder.  Garnish with parsley.  

(4)  Bake the lasagna covered for 30 minutes.  Uncover and bake an additional 15 minutes until the cheese is bubbly and the top is lightly browned.  

(5)  Allow the lasagna to cool for 10-15 minutes before cutting it.  Enjoy! 

*A salad and a bread of your preference make a complete delicious meal.  This is great to serve when company is over since it's such a large dish and can be made ahead of time for minimal clean up.*




Sunday, June 1, 2014

How About a Little Blue in Your Burger?


Today I bring you a recipe that is perfect for the summer months. Great for the grill and great for any blue cheese lover.  It smells fabulous while cooking and is super moist and juicy-beefy. My husband loves blue cheese which was my inspiration for trying this out.  I was pretty pleased with it too. :)  There are some other ingredients which we'll start with that compliment the blue cheese.  So you'll start by chopping up green onions and garlic - two of my favorites for just about any recipe! ;) 


You'll put a pound of ground beef, the garlic and green onions, a tablespoon of Dijon mustard, an egg, some water, salt, pepper, and of course, blue cheese in a medium sized mixing bowl.


And...


...Mix it together with your hands!  My favorite part. ;)

Now for the buns.  I prefer to use white bread buns or ciabatta buns.  (A lot of times I can find a package of 8 buns on clearance at the grocery store bakery for just 99 cents!)  Never forget to make the buns the best they can be.  The burger might be fantastic but if the bread is too soft, or too dry, or crumbly it will put a huge damper on the rest of that deliciousness. I've found that the easiest way for me to make the buns a great compliment to the burger, is to brush them with olive oil and then place them on the skillet or grill until they are honey brown.


So much more visual appeal and they taste better.


All that's left to do now is cook the burgers to your desired doneness.  And then, you have this...


  All you have to do is add on condiments and dig in!  Super easy, super simple and it can be done in about 20 minutes start to finish.  Summer is burger time and this is just one of many ways to switch up it a little and add some different flavors.


Blue Cheese Burgers

1 pound ground beef
1 tbsp. Dijon mustard
2 cloves minced garlic
2 green onions, chopped
1/2 cup (about 2 ounces) crumbled blue cheese
1 egg
1 tbsp. water
salt
freshly ground black pepper

(1) Using your hands mix all ingredients in a medium sized bowl.  Do not over mix; mix only until the ingredients are all combined.  Shape into patties that are slightly larger than the buns you'll be using.

(2) Heat up grill or skillet.  Brush buns with olive oil and place on cooking surface until lightly browned and crispy around the edges.  Cook the patties 5-7 minutes on both sides.  Don't press down on the burgers while they cook.  

(3) Serve on buns, add condiments, and enjoy! :)


Wednesday, May 28, 2014

I'M BACK!!!

Well, it certainly took long enough, but I'm back!  Can't believe my last post was at the beginning of February.  I had meant to post something explaining that I would be taking a break from blogging and would be back in the late spring, but forgot!  Long story short - I got married! :)  I was planning a wedding (and starting a new job, and fixing up a house) and in the last few months of it life got hectic and I had to take a break from blogging.  

That hiatus is over now though!  "That Old Oven" will once again have new recipes posted each week.  I'm so excited because I have been trying so many new recipes in my new house that will have your taste buds tingling - desserts, veggies, dressings, meaty dishes, everything!  In an upcoming post, I will have photos of my new kitchen with... get ready for it... a NEW oven! What???  I am in love with my new oven.  I've gotta tell ya, the quirks of 'that old oven' made cooking a little challenging at times.  However, even with my new oven, the blog will still be called "That Old Oven" because after all, I learned to cook and fell in love with cooking (and food!) with the old oven.  

So, no recipe in today's post but I've included a few photos of upcoming recipe posts that you can drool over until I put something up this weekend.  Enjoy. :)


Sunday, February 2, 2014

Chicken With Lemon & Green Onion Sauce


Time to take a break from the sweets and carbs. :) This week's recipe is easy, delicious, and a lighter dish.  I found this gem one day when I was searching for something to make for supper.  I was going to make something with chicken but didn't want the usual fried chicken, Parmesan chicken, chicken casserole, etc.  So I typed "chicken recipe" or something into Google and quickly found this.  This one stood out because the photo accompanying it looked fabulous and all of the ingredients are basic and on-hand in most kitchens.  This dish also only takes about 25 minutes from start to finish!  

You will start off with 4 boneless chicken breasts; trim any fat off of them.  The final product of this chicken is not supposed to be very thick.  You can buy chicken breasts cut thin (I think they're called "cutlets"?) but if you have the regular size, just make sure you hold them up on one side and slice down the middle to make two thinner chicken slices.  It's also a good idea to put the chicken between two pieces of plastic wrap and pound them with a meat tenderizer.  This will not only help to flatten them out, it also makes them a little juicier and more tender once they have cooked.  

Prepping the chicken for the oven is very simple. Just brush oil on them and rub with salt and pepper.  You can cook these on a broiler pan (as the recipe will say) or just on a regular foil-lined cookie sheet.  I actually just realized for the first time today that the recipe says to cook them on a broiler pan - I've always used a cookie sheet. :)


Pop them in an oven that has been heated to 350 degrees.  They will only take about 15 minutes max. to cook so as soon as they are in the oven, you can begin making the sauce.  

This is the most fun part of the whole recipe because you get to do a lot of chopping here! You will chop up the green onions, parsley, and garlic. (It's totally fine to use either fresh or dried parsley.)  Then add in the lemon juice and lemon zest and mix it all up.  At this point, you'll have a beautiful bowl of seasoning to take this chicken to the next level.


But wait!  We must never, ever forget the butter - it's what makes this sauce saucy after all. :)  Melt the butter on high heat in a sauce pan and stir in the seasonings.  Once that boils, let it simmer about 30 seconds and then remove from the heat.  

By now, the chicken will be practically finished. When there is only 1 minutes left of cooking time, take the chicken out of the oven and spoon a bit of the sauce over each piece of chicken.  Place back in oven for 1 minute.


And that's it!  The chicken is now ready to be served.  


This is super easy and great for a night when you need supper fast. This recipe is a staple in my kitchen and I hope it will be one in yours as well.  It is a rather versatile dish and can be paired with many different side dishes.  Enjoy! 


What side dish(es) will you pair with this?  Let me know in the comments section below!


Chicken with Lemon & Green Onion Sauce

4 boneless chicken breast halves
4 tblsp. butter
1 1/2 tblsp. lemon juice
1/2 tsp. lemon zest
2 green onions, chopped
1 clove garlic, minced (or 1/8 tsp. garlic powder)
1 tsp. chopped fresh parsley (or 1 tsp. dried parsley)
salt
black pepper
olive or canola oil

(1) Preheat oven to 350.  Line a broiler pan with foil and oil the rack.

(2) Rinse chicken and pat dry.  Place between two sheets of plastic wrap and pound to an even thickness. Brush with olive oil and rub with salt & pepper.  Arrange on pan and place in oven 12-15 minutes.  Turn over halfway through cooking time.

(3) Combine the remaining ingredients in a saucepan and boil.  Once boiling, reduce heat and simmer for about 30 seconds.

(4)  Drizzle each chicken breast with 1 teaspoon of sauce 1 minute before cooking time finishes.  Serve chicken with the remaining sauce.  

(5) Eat up! :)